Because you want to create a grand entrance for your workbook when it opens & stand out from the crowd.
Why not show off a bit if you can! By designing and displaying an awesome, animated, eye catching splash screen you are impressing the user & showing them that this is no dull & ordinary spreadsheet. You will add a level of style & professionalism that spreadsheets often lack.
Splash screens were initially designed to distract a user from how long an application was taking to load, but It can also be used for a little advertising, or to communicate any important information to a user so that they don't need to discover things too late or by mistake.
Follow the simple steps below to design & add a user form to your spreadsheet.
You can add whatever images & labels to the form that you want. I usually include a logo, the title of my project, my name, a link to my website and various labels that give the user any information that they might need. In the example below the spreadsheet is designed to automatically close after a time if the user has left it inactive, so they need to be aware of this before they start editing it.
You can name your objects whatever you like, I shall just let excel number my labels as it does sequentially and name my userform "SplashUserForm"
The example above is a splash screen i made for a project where we need to warn users to keep their work saved as the workbook will close after a period of inactivity. You can find this solution on this site here. In this example there are several labels, the label named "label1" that says “Loading Data…” is the label which will provide the animation I’ll use it to update the status. It needs to be named "label1" as it will be referenced by the VBA code that we are going to add into a macro later.
You can ignore the title bar or 'caption' of the UserForm as we're going to hide it later so it won't even be seen!
Now we need to add some animation to our splash screen, we will do this by adding some VBA code to it, it's really quite easy !
Private Sub UserForm_Activate()
    Application.Wait (Now + TimeValue("00:00:01"))
    SplashUserForm.Label1.Caption = "Loading Data..."
    SplashUserForm.Repaint
    Application.Wait (Now + TimeValue("00:00:01"))
    SplashUserForm.Label1.Caption = "Creating Forms..."
    SplashUserForm.Repaint
    Application.Wait (Now + TimeValue("00:00:01"))
    SplashUserForm.Label1.Caption = "Opening..."
    SplashUserForm.Repaint
    Application.Wait (Now + TimeValue("00:00:01"))
    Unload SplashUserForm
End Sub
The VB Editor window should now appear as below. You can leave the SplashUserForm code window open in the VB Editor or save & close it if you dont like your desktop to be too cluttered with open windows.

This code repeatedly updates the caption of "label1" until the userform is exited. How long this takes will depend on what you enter into the four time values. The Splash screen will stay open for as long as the duration of those three time periods.
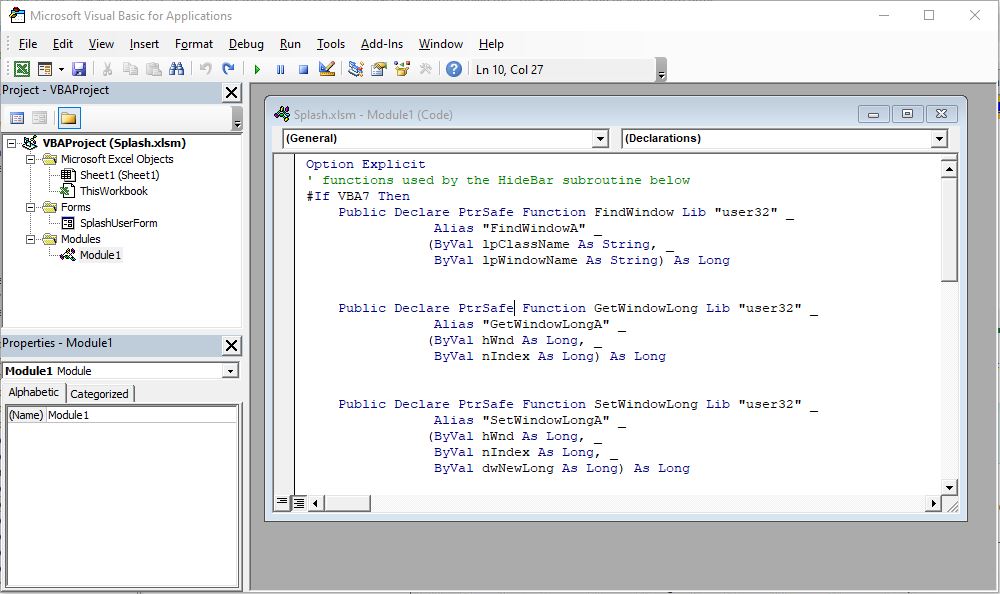
Next we want to hide the title bar showing the User Form Name & the red X in the upper right hand corner. This will stop your your splash screen looking like some kind of error message box & give it the profesional look you are after.
Option Explicit
' functions used by the HideBar subroutine below
#If VBA7 Then
    Public Declare PtrSafe Function FindWindow Lib "user32" _
                Alias "FindWindowA" _
               (ByVal lpClassName As String, _
                ByVal lpWindowName As String) As Long


    Public Declare PtrSafe Function GetWindowLong Lib "user32" _
                Alias "GetWindowLongA" _
               (ByVal hWnd As Long, _
                ByVal nIndex As Long) As Long


    Public Declare PtrSafe Function SetWindowLong Lib "user32" _
                Alias "SetWindowLongA" _
               (ByVal hWnd As Long, _
                ByVal nIndex As Long, _
                ByVal dwNewLong As Long) As Long


    Public Declare PtrSafe Function DrawMenuBar Lib "user32" _
               (ByVal hWnd As Long) As Long
#Else
    Public Declare Function FindWindow Lib "user32" _
                Alias "FindWindowA" _
               (ByVal lpClassName As String, _
                ByVal lpWindowName As String) As Long


    Public Declare Function GetWindowLong Lib "user32" _
                Alias "GetWindowLongA" _
               (ByVal hWnd As Long, _
                ByVal nIndex As Long) As Long


    Public Declare Function SetWindowLong Lib "user32" _
                Alias "SetWindowLongA" _
               (ByVal hWnd As Long, _
                ByVal nIndex As Long, _
                ByVal dwNewLong As Long) As Long


    Public Declare Function DrawMenuBar Lib "user32" _
               (ByVal hWnd As Long) As Long
#End If


Sub HideBar(frm As Object)
'code to hide the title bar on the splash screen
Dim Style As Long, Menu As Long, hWndForm As Long
hWndForm = FindWindow("ThunderDFrame", frm.Caption)
Style = GetWindowLong(hWndForm, &HFFF0)
Style = Style And Not &HC00000
SetWindowLong hWndForm, &HFFF0, Style
DrawMenuBar hWndForm

End Sub
The VB Editor window should now appear as below. Now hit save & close.

Nearly done!
We now need to go back to the SplashUserForm window and add the following code underneath the code you entered earlier and again hit save. This code tells the splash screento hide the border & title bar.
Private Sub UserForm_Initialize()

'Remove Border and Title Bar
HideBar Me

End Sub
The VB Editor window should now appear as below. Now hit save & close.

And finally!
We now only need to tell the workbook to display the splashscreen when it first opens, and all is done!
Just go back again to the Project Explorer Pane in the VB Editor window, double click ThisWorkbook and just as you did with the SplashUserForm and Module1 paste the following code into the window that opens and again hit save & close.
Private Sub Workbook_Open()
    Application.ScreenUpdating = False
    ActiveWindow.Visible = False
    SplashUserForm.Show
    Windows(ThisWorkbook.Name).Visible = True
    Application.ScreenUpdating = True
End Sub
That's it all done! congratulations. Save your workbook, close and reopen it to see your Splash Screen work of art.
